


Analysis Server – Administration – Contract Management – Vendors #
This document provides information on how to navigate and use the Vendors page of Contract Management under the Open iT Analysis Server Administration tab.
Einführung #
The Vendors page contains various functionalities to manage the list of vendors for contract management. The page is only visible to users with Administrative rights to Open iT Analysis Server.
Folgen Sie diesen Anweisungen, um die Seite aufzurufen:
- Öffnen Sie die Web-Oberfläche des Open iT Analysis Servers mit einem Web-Browser.
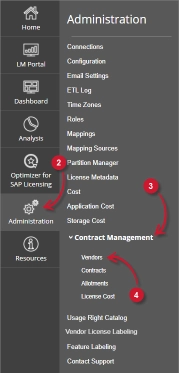
- Bewegen Sie den Mauszeiger über die Registerkarte Verwaltung. Warten Sie, bis die Unterregisterkarten erscheinen.
- Click the Contract Management tab to display all the sub-tabs.
- Click the Vendors sub-tab.
The Vendors page should be displayed.
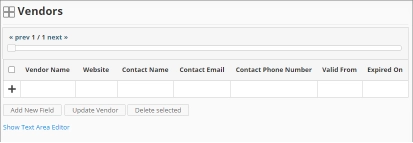
Use the following descriptions of the columns for proper configuration:
- Vendor Name – the specific name of the Vendor
- Website – the URI of the website of the Vendor
- Contact Name – specific name of the person to contact related to the Vendor
- Contact Email – the email address of the contact person
- Contact Phone Number – the contact details of the contact person
- Valid From – the start date of validity of the Vendor
- Expired On – the end date of validity of the Vendor
Anforderungen #
Ensure to meet the following requirements before using the Vendors page:
- Die SQL-Datenbank wurde erfolgreich erstellt.
- Enable Contract Management using the the Configuration page.
- List of vendors with details.
- Prepared file containing all vendors when using the Text Area Editor.
- Verwaltungsrechte des aktuellen Webbenutzers.
Hinzufügen von Datensätzen #
Follow these instructions to add a vendor entry:
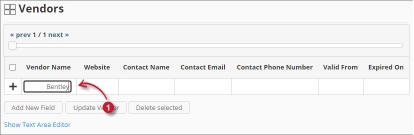
- In the Vendors table, click the Vendor Name column. This should transform into a textbox. Provide the name of the vendor.
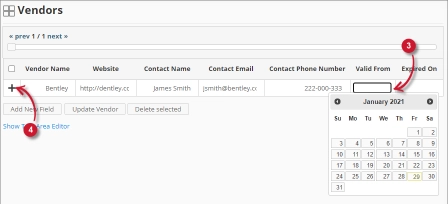
- Repeat the steps with the other columns – Website, Contact Name, Contact Email, und Contact Phone Number.

Figure 3. Analysis Server Administration: Vendors – Adding Record - Choose the date range for the validity of the vendor.
- Click the add symbol (+) located at the first column of the row.

Figure 4. Analysis Server Administration: Vendors – Adding Record
The list of vendors should include the newly added item.
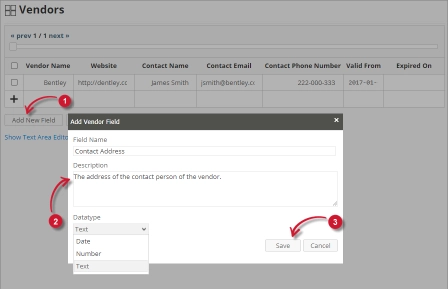
Adding a New Field #
Follow these instructions to add a new column for Vendor details:
- At the bottom of the Vendors table, click the Add New Field button.
The Add Vendor Field dialog should appear. - Provide the following details.
- Field Name – a descriptive name of the field
- Description – a brief description of the field
- Datatype – the type of data the field accepts
- Klicken Sie auf Speichern Sie um fortzufahren.

Figure 5. Analysis Server Administration: Vendors – Adding New Field
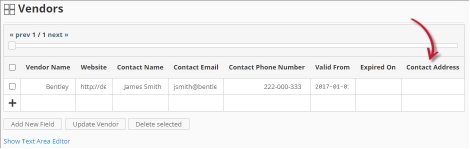
The Vendors table should include the newly added column.
Figure 6. Analysis Server Administration: Vendors – Added New Field
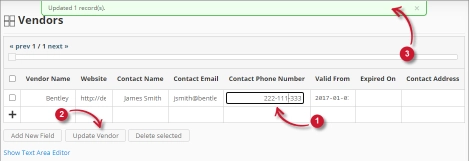
Updating a Record #
Follow these instructions to update a specific record:
- In the Vendors table, click the value of the column to update. This should transform to a textbox.
- Click the Update Vendor button at the bottom of the Vendors table.
- A notification message should appear at the top of the page showing the status of the update.

Figure 7. Analysis Server Administration: Vendors – Updating Record
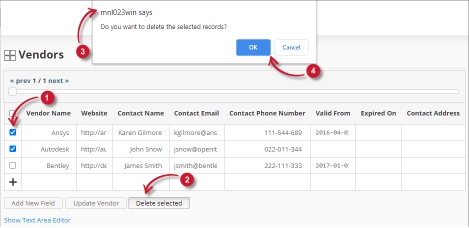
Datensatz löschen #
Follow these instructions to delete record(s) from the Vendors table:
- Click the corresponding checkbox of the record to deleted.
- Click the Delete selected button at the bottom of the table.
- Es sollte eine Bestätigungsmeldung erscheinen.
- Klicken Sie auf OK um fortzufahren.

Figure 8. Analysis Server Administration: Vendors – Deleting Record
The Vendors table should automatically be updated.
Textbereich-Editor #
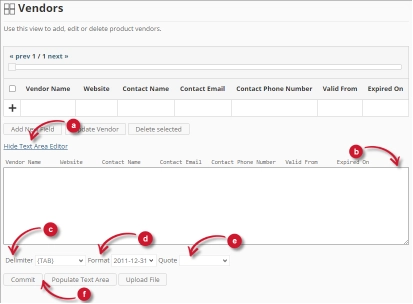
Abbildung 9. Analysis Server Administration Textbereich Editor Details
Textbereich-Editor Details #
Der Textbereich-Editor ist eine weitere Möglichkeit zum Hinzufügen, Bearbeiten und Löschen von Datensätzen in der Liste. Der Editor hat die folgenden Komponenten:
- Link umschalten - schaltet die Anzeige des Textbereichseditors um.
- Textbereich - Bereich, in dem die Datensätze eingefügt und bearbeitet werden können.
- Trennzeichen - das Zeichen, das als Trennzeichen für jedes Element in einem Datensatz verwendet wird.
- Format - das für Datumsangaben zu verwendende Format.
- Anführungszeichen - Anführungszeichen zur Trennung der einzelnen Elemente in einem Datensatz.
- Befehle:
- Bestätigen - speichert die im Textbereich vorgenommenen Änderungen.
- Populate Text Area – retrieve all the records from the table and display it in the text area.

Abbildung 10. Administration des Analyseservers mit dem Textbereichseditor
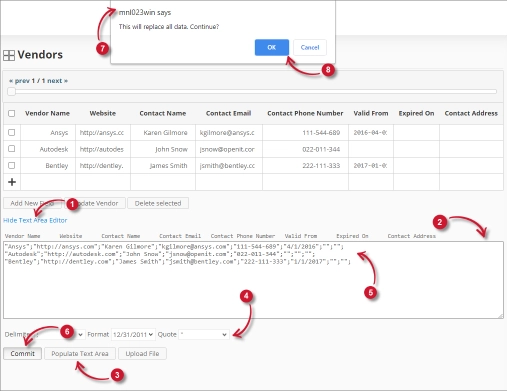
Textbereich-Editor verwenden #
Befolgen Sie diese Anweisungen, um den Textbereich-Editor zu verwenden:
- Click the toggle link Show/Hide Text Area Editor.
The Text Area Editor should be displayed. - Klicken Sie auf die Schaltfläche Textbereich befüllen. Der Textbereich-Editor sollte ausgefüllt werden.
- Ändern Sie die Datensätze wie gewünscht. Verwenden Sie die Komponenten für Trennzeichen, Format und Zitat.
Um einen Datensatz hinzuzufügen, fügen Sie einfach eine neue Zeile hinzu.
Um einen Datensatz zu löschen, löschen Sie einfach die gesamte Zeile des Datensatzes. - Klicken Sie auf Textbereich befüllen, um die ausgewählten Formate anzuwenden. Beachten Sie, dass das ausgewählte Begrenzungszeichen, Format und Anführungszeichen im Textbereichseditor angewendet werden sollten.
- Klicken Sie auf die Schaltfläche Bestätigen.
Es sollte eine Warnmeldung angezeigt werden, um die Übernahme der Änderungen zu bestätigen. - Klicken Sie auf OK, um fortzufahren.
Die Liste sollte automatisch aktualisiert werden.
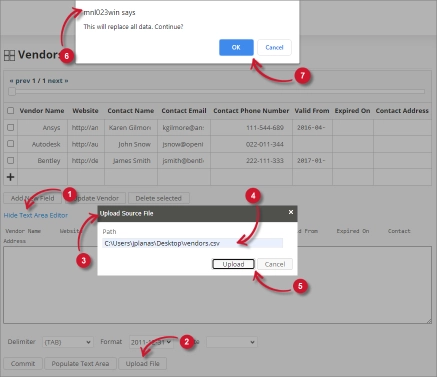
Uploading a Source File #
Follow these instructions to upload a prepared source file of Vendor details:
- Click the Toggle Link of the Text Area Editor.
- At the bottom of the page, click the Upload File button.
- The Upload Source File dialog should appear.
- Provide the valid path of the source file. The UNC path (\\path_to_file) is accepted.
- Click the Upload button to continue.
- A confirmation message of the upload process should appear.
- Klicken Sie auf OK, um fortzufahren.
Fehlersuche #
This part provides the possible work around for a known issue in the Vendors page.
Fehlerseite wird angezeigt, wenn der Zugriff nicht über localhost erfolgt #
There will be times when accessing the Vendors page remotely or via hostname; it displays an error page.

Verwenden Sie die folgenden Vorschläge, um dieses Problem zu beheben:
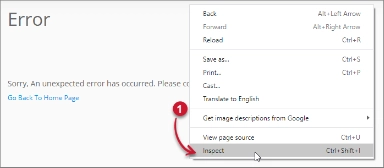
Auf Fehler in der Webbrowser-Konsole prüfen #
Befolgen Sie diese Anweisungen, um in der Konsole des Webbrowsers nach Fehlern zu suchen:
- In der Vendors Seite, klicken Sie mit der rechten Maustaste auf eine beliebige Stelle auf der Seite und wählen Sie Überprüfen Sie.

Figure 13. Analysis Server Vendors Page Troubleshooting: Error page displayed – Inspect
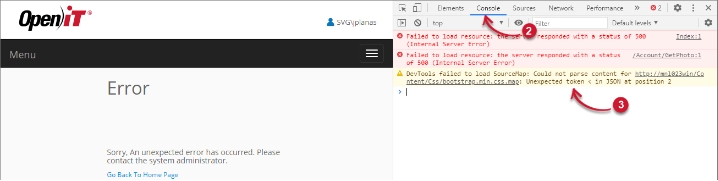
Die Entwickler-Tools erscheinen sollte. - Wählen Sie Konsole aus den verfügbaren Registerkarten des Tools.
Die Konsole listet die Transaktionen des Webbrowsers einschließlich der Fehler auf.
Figure 14. Analysis Server Vendors Page Troubleshooting: Error page displayed – Console - Fehler in der Konsole können manchmal zu technisch sein. Um eine sofortige Antwort zu erhalten, senden Sie die Fehlerdetails an support@openit.com.
Zugriff auf die Website über localhost #
Um die tatsächliche Fehlermeldung des Servers zu sehen, gehen Sie zu dem Rechner, auf dem der Open iT Analysis Server läuft, und rufen Sie dann in einem Browser http://localhost auf. Es sollte die echte Fehlermeldung angezeigt werden.