


Analysis Server – Administration – Contract Management – Vendors #
This document provides information on how to navigate and use the Vendors page of Contract Management under the Open iT Analysis Server Administration tab.
導入#
The Vendors page contains various functionalities to manage the list of vendors for contract management. The page is only visible to users with Administrative rights to Open iT Analysis Server.
以下の指示に従ってページに移動してください:
- Web ブラウザを使用して、Open iT Analysis Server Web インターフェイスを開きます。
- 管理」タブにカーソルを合わせる。サブタブが表示されるまで待つ。
- Click the Contract Management tab to display all the sub-tabs.
- Click the Vendors sub-tab.
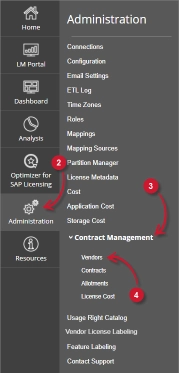
The Vendors page should be displayed.
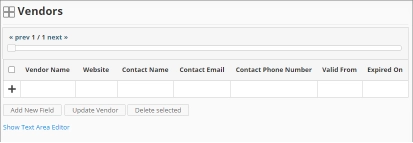
Use the following descriptions of the columns for proper configuration:
- Vendor Name – the specific name of the Vendor
- Website – the URI of the website of the Vendor
- Contact Name – specific name of the person to contact related to the Vendor
- Contact Email – the email address of the contact person
- Contact Phone Number – the contact details of the contact person
- Valid From – the start date of validity of the Vendor
- Expired On – the end date of validity of the Vendor
要件 #
Ensure to meet the following requirements before using the Vendors page:
- SQLデータベースが正常に作成されました。
- Enable Contract Management using the the Configuration page.
- List of vendors with details.
- Prepared file containing all vendors when using the Text Area Editor.
- 現在のウェブユーザーの管理権限。
レコードの追加 #
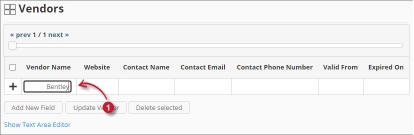
Follow these instructions to add a vendor entry:
- In the Vendors table, click the Vendor Name column. This should transform into a textbox. Provide the name of the vendor.
- Repeat the steps with the other columns – ウェブサイト, Contact Name, Contact Email, と Contact Phone Number.

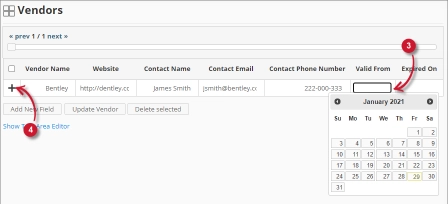
Figure 3. Analysis Server Administration: Vendors – Adding Record - Choose the date range for the validity of the vendor.
- Click the add symbol (+) located at the first column of the row.

Figure 4. Analysis Server Administration: Vendors – Adding Record
The list of vendors should include the newly added item.
Adding a New Field #
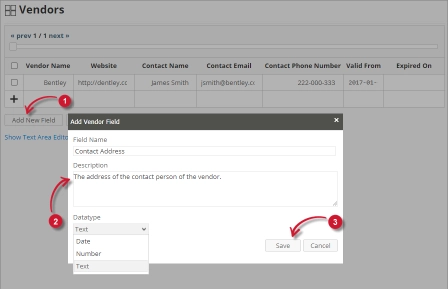
Follow these instructions to add a new column for Vendor details:
- At the bottom of the Vendors table, click the Add New Field button.
The Add Vendor Field dialog should appear. - Provide the following details.
- Field Name – a descriptive name of the field
- Description – a brief description of the field
- Datatype – the type of data the field accepts
- クリック セーブ を続ける。

Figure 5. Analysis Server Administration: Vendors – Adding New Field
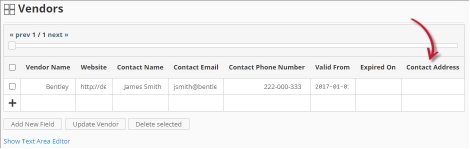
The Vendors table should include the newly added column.
Figure 6. Analysis Server Administration: Vendors – Added New Field
Updating a Record #
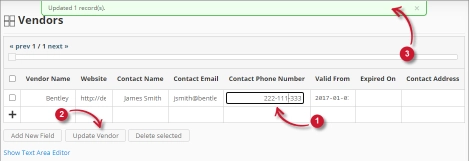
Follow these instructions to update a specific record:
- In the Vendors table, click the value of the column to update. This should transform to a textbox.
- Click the Update Vendor button at the bottom of the Vendors table.
- A notification message should appear at the top of the page showing the status of the update.

Figure 7. Analysis Server Administration: Vendors – Updating Record
レコードの削除 #
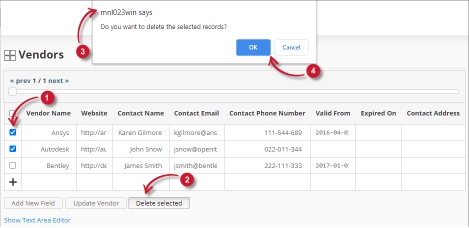
Follow these instructions to delete record(s) from the Vendors table:
- Click the corresponding checkbox of the record to deleted.
- Click the Delete selected button at the bottom of the table.
- 確認メッセージが表示されるはずです。
- クリック OK を続ける。

Figure 8. Analysis Server Administration: Vendors – Deleting Record
The Vendors table should automatically be updated.
テキストエリア・エディター #
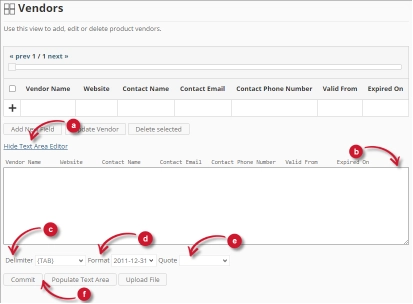
図 9.分析サーバー管理テキスト・エリア・エディタの詳細
テキスト・エリア・エディターの詳細 #
テキスト・エリア・エディタは、リスト内のレコードを追加、編集、削除するもう一つの方法である。エディタには以下のコンポーネントがあります:
- Toggle link- テキスト・エリア・エディタの表示を切り替えます。
- テキストエリア- レコードを貼り付けて操作するエリア。
- 区切り文字- レコードの各項目の区切り文字として使用する文字。
- Format- 日付に使用するフォーマット。
- Quote- レコードの各項目を区切るために使用する引用符。
- コマンド:
- コミット- テキストエリアで行った変更を保存します。
- Populate Text Area – retrieve all the records from the table and display it in the text area.

図 10.テキスト・エリア・エディタを使用した分析サーバー管理
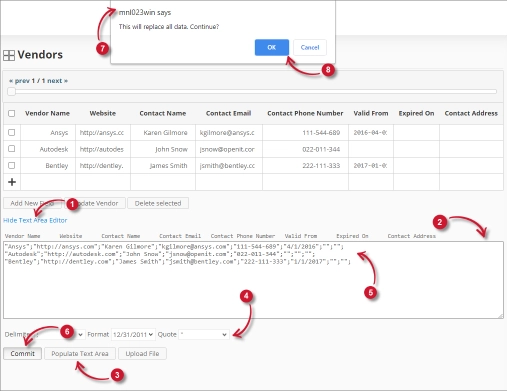
テキストエリア・エディタの使用 #
テキストエリア・エディターの使い方は以下の通りです:
- Click the toggle link Show/Hide Text Area Editor.
The Text Area Editor should be displayed. - Populate Text Areaボタンをクリックします。テキスト・エリア・エディターに入力されます。
- 必要に応じてレコードを修正する。
。 レコードを追加するには、単に新しい行を追加します。
。 レコードを削除するには、単にレコードの行全体を削除します。 - 選択した書式を適用するには、「テキストエリアに入力」をクリックします。選択した区切り文字、書式、引用符がテキスト・エリア・エディターで適用されることに注意してください。
変更の適用を確認する警告メッセージが表示されるはずです。
リストは自動的に更新されるはずです。
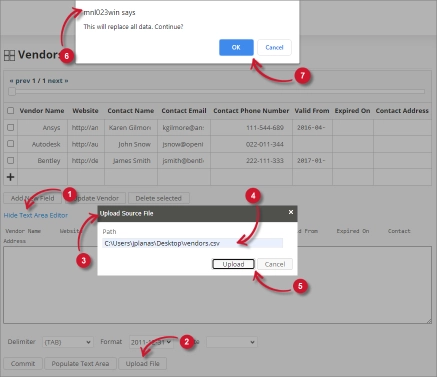
Uploading a Source File #
Follow these instructions to upload a prepared source file of Vendor details:
- Click the Toggle Link of the Text Area Editor.
- At the bottom of the page, click the Upload File button.
- The Upload Source File dialog should appear.
- Provide the valid path of the source file. The UNC path (\\path_to_file) is accepted.
- Click the Upload button to continue.
- A confirmation message of the upload process should appear.
- OKをクリックして続ける。
トラブルシューティング #
This part provides the possible work around for a known issue in the Vendors page.
ローカルホスト以外からのアクセス時に表示されるエラーページ #
There will be times when accessing the Vendors page remotely or via hostname; it displays an error page.

この問題のトラブルシューティングには、以下の提案を使用してください:
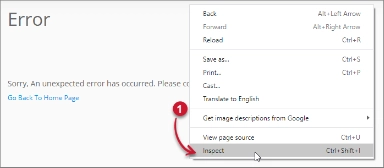
ウェブブラウザのコンソールエラーのチェック #
以下の手順に従って、ウェブブラウザのコンソールでエラーをチェックしてください:
- の中で Vendors ページ内の任意の場所で右クリックし 検査.

Figure 13. Analysis Server Vendors Page Troubleshooting: Error page displayed – Inspect
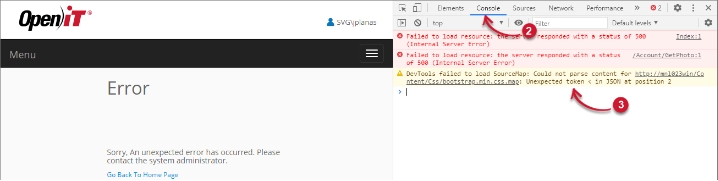
について 開発ツール が現れるはずだ。 - 選ぶ コンソール ツールの利用可能なタブから選択します。
コンソールは、エラーを含むウェブ・ブラウザのトランザクションを一覧表示する。
Figure 14. Analysis Server Vendors Page Troubleshooting: Error page displayed – Console - コンソールのエラーは専門的すぎる場合があります。すぐに対応するには、エラーの詳細をsupport@openit.com に送信してください。
ローカルホストからウェブサイトにアクセスする #
サーバーの実際のエラーメッセージを確認するには、Open iT Analysis Server をホストしているマシンに移動し、ブラウザでhttp://localhost にアクセスします。実際のエラーメッセージが表示されるはずです。