


This document provides information on how to navigate and use the Allocations page of Contract Management under the Open iT Analysis Server Administration tab.
Introducción #
The Allocations page contains various functionalities to manage the list of specific allotment corresponding to a specific contract for contract management. The page is only visible to users with Administrative rights to Open iT Analysis Server.
Siga estas instrucciones para navegar hasta la página:
- Abra la interfaz web de Open iT Analysis Server mediante un navegador web.
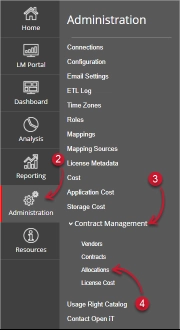
- Sitúe el cursor sobre la pestaña Administración. Espere a que aparezcan las subpestañas.
- Click the Contract Management tab to display all the sub-tabs.
- Haga clic en el botón Allocations sub-tab.

Figure 1. Analysis Server Administration: Contract Management – Allocations – Navigation
The Allocations page should be displayed.
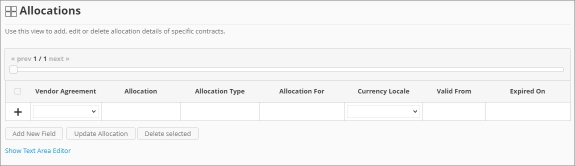
Figure 2. Analysis Server Administration: Contract Management – Allocations Page
Use the following descriptions of the columns for proper configuration:
- Vendor Agreement – the specific Contract the allocation is made for. The list is available when there are entries on the Contracts page
- Allocation – the specific value allocated for the contract
- Allocation Type – the specific type of value the allocation accepts
- Allocation For – a specific category the allocation is made for computing.
- Currency Locale – the specific locale code used as basis for handling currency format.
- Valid From – the start date of validity of the allocation
- Expired On – the end date of validity of the allocation
Requisitos #
Ensure to meet the following requirements before using the Allocations page:
- La base de datos SQL se ha creado correctamente.
- Enable Contract Management using the the Configuration page.
- Added Contracts using the Contracts page.
- List of allocations with details.
- Prepared file containing all allocations when using the Text Area Editor.
- Derechos administrativos del usuario web actual.
Añadir registro #
Follow these instructions to add an allocation entry:
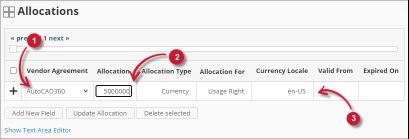
- In the Allocations table, choose among the available Vendor Agreement.
- Click the Allocation column. This should transform into a textbox. Provide the desired value of the allocation.
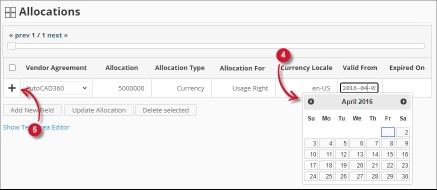
- Repeat the steps with the other columns – Allocation Type, Allocation For, y Currency Locale.

Figure 3. Analysis Server Administration: Allocations- Adding Record - Choose the date range for the validity of the vendor.
- Click the add symbol (+) located at the first column of the row.

Figure 4. Analysis Server Administration: Allocations – Adding Record
The list of allocations should include the newly added item.
Adding a New Field #
Follow these instructions to add a new column for Allocation details:
- At the bottom of the Allocations table, click the Add New Field button.
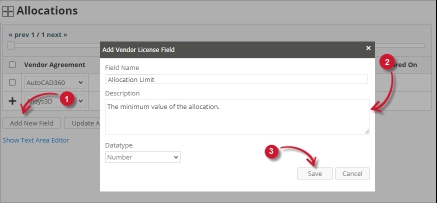
The Add Vendor License Field dialog should appear. - Provide the following details.
- Field Name – a descriptive name of the field
- Description – a brief description to describe the field
- Datatype – the type of data the field accepts
- Haga clic en Guardar para continuar.

Figure 5. Analysis Server Administration: Allocations – Adding New Field
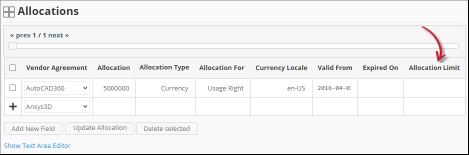
The Allocations table should include the newly added column.
Figure 6. Analysis Server Administration: Allocations – Adding New Field
Updating a Record #
Follow these instructions to update a specific record:
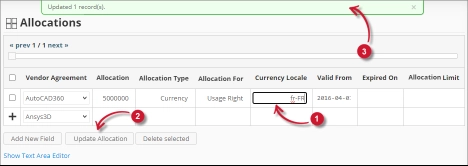
- In the Allocations table, click the value of the column to update. This should transform to a textbox.
- Click the Update Allocation button at the bottom of the Allocations table.
- A notification message should appear at the top of the page showing the status of the update.

Figure 7. Analysis Server Administration: Allocations – Updating Record
Borrar registro #
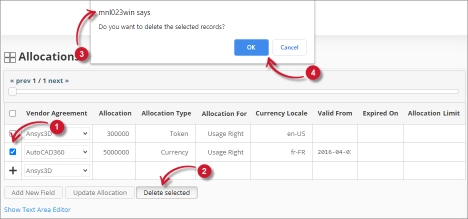
Follow these instruction to delete record(s) from the Allocations tables:
- Click the corresponding checkbox of the record to deleted.
- Click the Delete selected button at the bottom of the table.
- Debería aparecer un mensaje de confirmación.
- Haga clic en Guardar para continuar.

Figure 8. Analysis Server Administration: Allocations – Deleting Record
The Allocations table should automatically be updated.
Editor de área de texto #
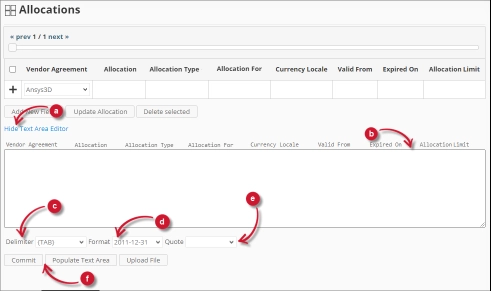
Figura 9. Detalles del editor del área de texto de administración de Analysis Server
Detalles del editor de áreas de texto #
El editor del área de texto es otra forma de añadir, editar y eliminar registros en la lista. El editor tiene los siguientes componentes:
- Alternar enlace: activa la visualización del editor del área de texto.
- Área de texto - área donde pegar y manipular los registros.
- Delimitador: carácter que se utilizará como separador para cada elemento de un registro.
- Formato - el formato a utilizar para las fechas.
- Comillas: comillas que se utilizan para separar cada elemento de un registro.
- Comandos:
- Confirmar: guarda los cambios realizados en el área de texto.
- Populate Text Area – retrieve all the records from the table and display it in the text area.

Figura 10. Administración del servidor de análisis mediante el editor de área de texto
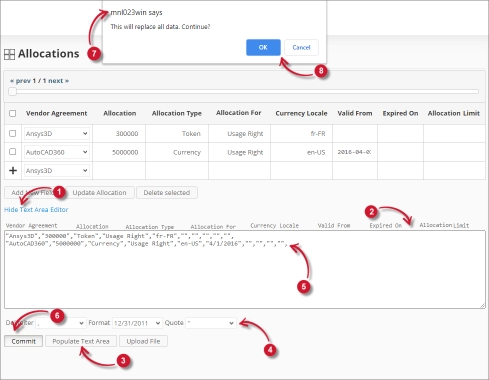
Uso del editor de áreas de texto #
Siga estas instrucciones para utilizar el editor de áreas de texto:
- Click the toggle link Show/Hide Text Area Editor.
The Text Area Editor should be displayed. - Haga clic en el botón Rellenar área de texto. El editor del área de texto debería estar rellenado.
- Modify the records as desired. Use the components for Delimiter, Format and Quote.
To add a record, simply add a new line.
To delete a record, simply delete the entire row of the record. - Haga clic en Rellenar área de texto para aplicar los formatos seleccionados. Observe que el delimitador, el formato y las comillas seleccionados deben aplicarse en el editor del área de texto.
- Click the Commit button.
A warning message should be prompted to confirm the application of the changes. - Click OK to continue.
The list should automatically be updated.
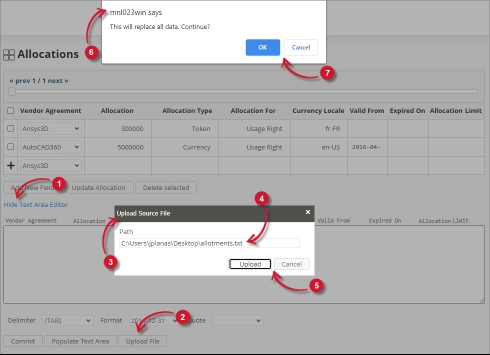
Uploading a Source File #
Follow these instructions to upload a prepared source file of Allocations details:
- Click the Toggle Link of the Text Area Editor.
- At the bottom of the page, click the Upload File button.
- The Upload Source File dialog should appear.
- Provide the valid path of the source file. The UNC path (\\path_to_file) is accepted.
- Click the Upload button to continue.
- A confirmation message of the upload process should appear.
- Haga clic en OK para continuar.

Figure 11. Analysis Server Administration: Allocations – Upload File
Solución de problemas #
This part provides the possible work around for known issue/s in the Allocations page.
Error page displayed when accessing page remotely #
There will be times when accessing the Allocations page remotely or via hostname displays an error page.

Figure 12. Analysis Server Allocations Page Troubleshooting: Error page displayed
Utilice las siguientes sugerencias para solucionar este problema:
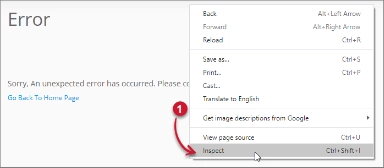
Comprobación de errores en la consola del navegador web #
Siga estas instrucciones para comprobar si hay errores en la consola del navegador web:
- En el Allocations haga clic con el botón derecho del ratón en cualquier lugar de la página y seleccione Inspeccione.

Figure 13. Analysis Server Allocations Page Troubleshooting: Error page displayed – Inspect
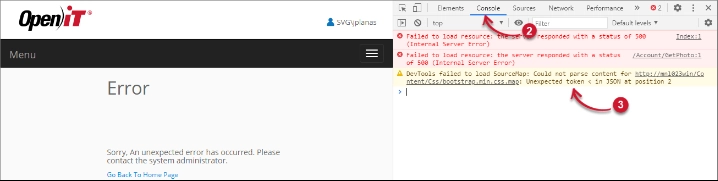
En Herramientas para desarrolladores debería aparecer. - Elija Consola de las pestañas disponibles de la herramienta.
La consola enumera las transacciones del navegador web, incluidos los errores.
Figure 14. Analysis Server Allocations Page Troubleshooting: Error page displayed – Console - Los errores en la consola pueden ser a veces demasiado técnicos, para una respuesta inmediata, envíe el detalle del error a support@openit.com.
Access the website through localhost #
Para ver el mensaje de error real del servidor, vaya a la máquina que aloja el servidor de análisis de Open iT y, a continuación, acceda a http://localhost en un navegador. Debería aparecer el mensaje de error real.
Para obtener asistencia o más ayuda sobre la configuración, póngase en contacto con el equipo de asistencia deOpen iT .
Para obtener referencias adicionales, puede visitar nuestra página de Documentación.