


This document provides information on how to navigate and use the Allocations page of Contract Management under the Open iT Analysis Server Administration tab.
Introduction #
The Allocations page contains various functionalities to manage the list of specific allotment corresponding to a specific contract for contract management. The page is only visible to users with Administrative rights to Open iT Analysis Server.
Suivez les instructions suivantes pour accéder à la page :
- Ouvrez l'interface web de l'Open iT Analysis Server à l'aide d'un navigateur web.
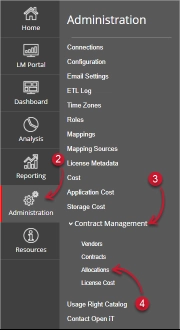
- Placez le curseur sur l'onglet Administration. Attendez que les sous-onglets apparaissent.
- Click the Contract Management tab to display all the sub-tabs.
- Cliquez sur le bouton Allocations sub-tab.

Figure 1. Analysis Server Administration: Contract Management – Allocations – Navigation
The Allocations page should be displayed.
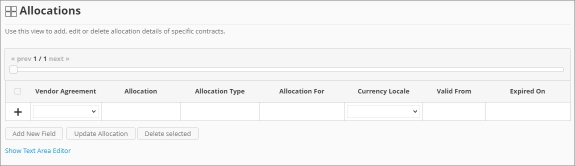
Figure 2. Analysis Server Administration: Contract Management – Allocations Page
Use the following descriptions of the columns for proper configuration:
- Vendor Agreement – the specific Contract the allocation is made for. The list is available when there are entries on the Contracts page
- Allocation – the specific value allocated for the contract
- Allocation Type – the specific type of value the allocation accepts
- Allocation For – a specific category the allocation is made for computing.
- Currency Locale – the specific locale code used as basis for handling currency format.
- Valid From – the start date of validity of the allocation
- Expired On – the end date of validity of the allocation
Exigences #
Ensure to meet the following requirements before using the Allocations page:
- La base de données SQL est créée avec succès.
- Enable Contract Management using the the Configuration page.
- Added Contracts using the Contracts page.
- List of allocations with details.
- Prepared file containing all allocations when using the Text Area Editor.
- Droits d'administration de l'utilisateur Web actuel.
Ajout d'un enregistrement #
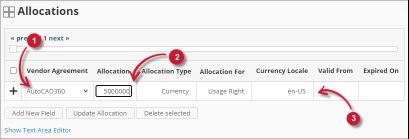
Follow these instructions to add an allocation entry:
- In the Allocations table, choose among the available Vendor Agreement.
- Click the Allocation column. This should transform into a textbox. Provide the desired value of the allocation.
- Repeat the steps with the other columns – Allocation Type, Allocation For, et Currency Locale.

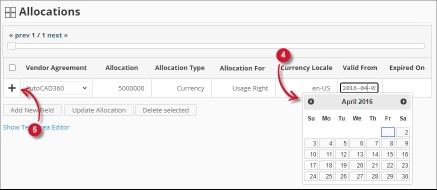
Figure 3. Analysis Server Administration: Allocations- Adding Record - Choose the date range for the validity of the vendor.
- Click the add symbol (+) located at the first column of the row.

Figure 4. Analysis Server Administration: Allocations – Adding Record
The list of allocations should include the newly added item.
Adding a New Field #
Follow these instructions to add a new column for Allocation details:
- At the bottom of the Allocations table, click the Add New Field button.
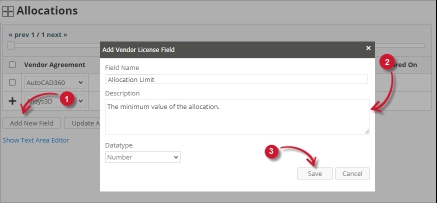
The Add Vendor License Field dialog should appear. - Provide the following details.
- Field Name – a descriptive name of the field
- Description – a brief description to describe the field
- Datatype – the type of data the field accepts
- Cliquez sur Économiser pour continuer.

Figure 5. Analysis Server Administration: Allocations – Adding New Field
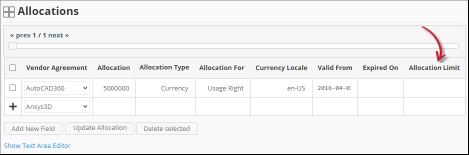
The Allocations table should include the newly added column.
Figure 6. Analysis Server Administration: Allocations – Adding New Field
Updating a Record #
Follow these instructions to update a specific record:
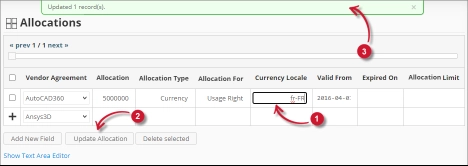
- In the Allocations table, click the value of the column to update. This should transform to a textbox.
- Click the Update Allocation button at the bottom of the Allocations table.
- A notification message should appear at the top of the page showing the status of the update.

Figure 7. Analysis Server Administration: Allocations – Updating Record
Suppression d'un enregistrement #
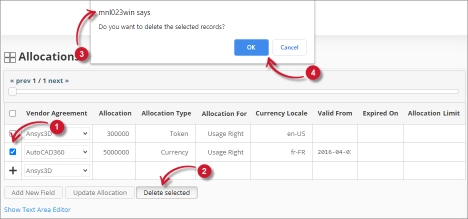
Follow these instruction to delete record(s) from the Allocations tables:
- Click the corresponding checkbox of the record to deleted.
- Click the Delete selected button at the bottom of the table.
- Un message de confirmation doit apparaître.
- Cliquez sur Économiser pour continuer.

Figure 8. Analysis Server Administration: Allocations – Deleting Record
The Allocations table should automatically be updated.
Éditeur de zone de texte #
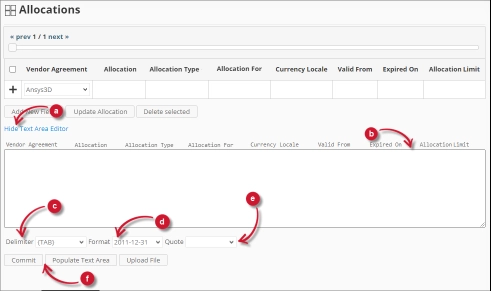
Figure 9. Détails de l'éditeur de la zone de texte d'Analysis Server Administration
Détails de l'éditeur de zone de texte #
L'éditeur de texte est un autre moyen d'ajouter, de modifier et de supprimer des enregistrements dans la liste. L'éditeur se compose des éléments suivants :
- Toggle link (lien basculant ) - permet de basculer l'affichage de l'éditeur de texte.
- Zone de texte - zone où l'on peut coller et manipuler les enregistrements.
- Délimiteur - le caractère à utiliser comme séparateur pour chaque élément d'un enregistrement.
- Format - le format à utiliser pour les dates.
- Citation - guillemets à utiliser pour séparer chaque élément d'un enregistrement.
- Commandes :
- Valider - enregistrer les modifications apportées dans la zone de texte.
- Populate Text Area – retrieve all the records from the table and display it in the text area.

Figure 10. Administration du serveur d'analyse à l'aide de l'éditeur de texte
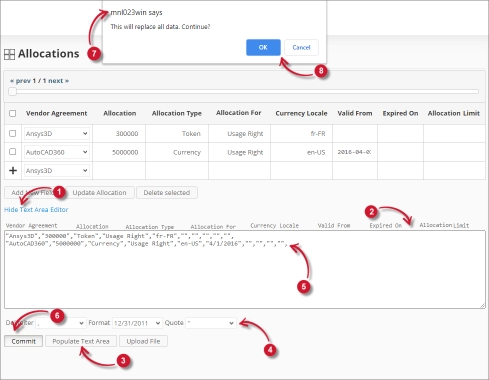
Utilisation de l'éditeur de zone de texte #
Suivez ces instructions pour utiliser l'éditeur de texte :
- Click the toggle link Show/Hide Text Area Editor.
The Text Area Editor should be displayed. - Cliquez sur le bouton Remplir la zone de texte. L'éditeur de zone de texte doit être rempli.
- Modify the records as desired. Use the components for Delimiter, Format and Quote.
To add a record, simply add a new line.
To delete a record, simply delete the entire row of the record. - Cliquez sur Remplir la zone de texte pour appliquer les formats sélectionnés. Notez que le délimiteur, le format et la citation sélectionnés doivent être appliqués dans l'éditeur de la zone de texte.
- Click the Commit button.
A warning message should be prompted to confirm the application of the changes. - Click OK to continue.
The list should automatically be updated.
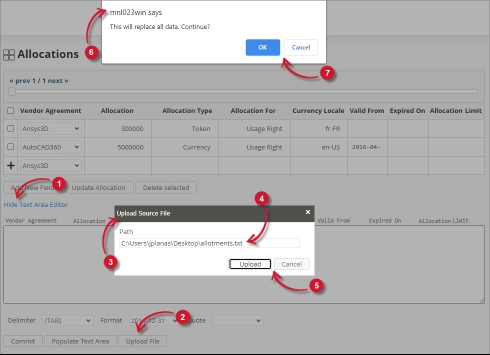
Uploading a Source File #
Follow these instructions to upload a prepared source file of Allocations details:
- Click the Toggle Link of the Text Area Editor.
- At the bottom of the page, click the Upload File button.
- The Upload Source File dialog should appear.
- Provide the valid path of the source file. The UNC path (\\path_to_file) is accepted.
- Click the Upload button to continue.
- A confirmation message of the upload process should appear.
- Cliquez sur OK pour continuer.

Figure 11. Analysis Server Administration: Allocations – Upload File
Dépannage #
This part provides the possible work around for known issue/s in the Allocations page.
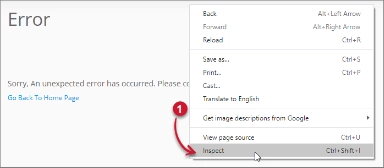
Error page displayed when accessing page remotely #
There will be times when accessing the Allocations page remotely or via hostname displays an error page.

Figure 12. Analysis Server Allocations Page Troubleshooting: Error page displayed
Utilisez les suggestions suivantes pour résoudre ce problème :
Vérifier les erreurs de la console du navigateur Web #
Suivez ces instructions pour vérifier les erreurs dans la console du navigateur web :
- Dans le cadre de la Allocations cliquez avec le bouton droit de la souris n'importe où dans la page et choisissez Contrôler.

Figure 13. Analysis Server Allocations Page Troubleshooting: Error page displayed – Inspect
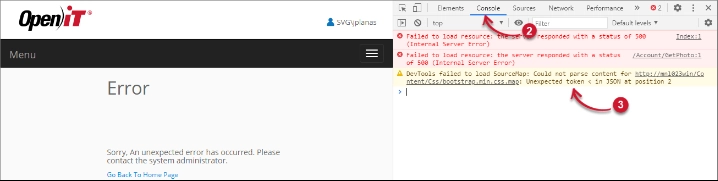
Les Outils du développeur devrait apparaître. - Choisir Console dans les onglets disponibles de l'outil.
La console répertorie les transactions du navigateur web, y compris les erreurs.
Figure 14. Analysis Server Allocations Page Troubleshooting: Error page displayed – Console - Les erreurs dans la console peuvent parfois être trop techniques. Pour une réponse immédiate, envoyez les détails de l'erreur à support@openit.com.
Access the website through localhost #
Pour voir le vrai message d'erreur du serveur, allez sur la machine qui héberge l'Open iT Analysis Server, puis accédez à http://localhost dans un navigateur. Le vrai message d'erreur devrait s'afficher.
Pour obtenir de l'aide ou un support de configuration supplémentaire, veuillez contacter votre équipe de support Open iT.
Pour des références supplémentaires, vous pouvez consulter notre page Documentation.