


This document provides information on how to navigate and use the Allocations page of Contract Management under the Open iT Analysis Server Administration tab.
導入#
The Allocations page contains various functionalities to manage the list of specific allotment corresponding to a specific contract for contract management. The page is only visible to users with Administrative rights to Open iT Analysis Server.
以下の指示に従ってページに移動してください:
- Web ブラウザを使用して、Open iT Analysis Server Web インターフェイスを開きます。
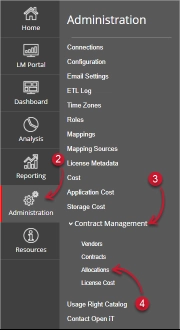
- 管理」タブにカーソルを合わせる。サブタブが表示されるまで待つ。
- Click the Contract Management tab to display all the sub-tabs.
- をクリックする。 Allocations sub-tab.

Figure 1. Analysis Server Administration: Contract Management – Allocations – Navigation
The Allocations page should be displayed.
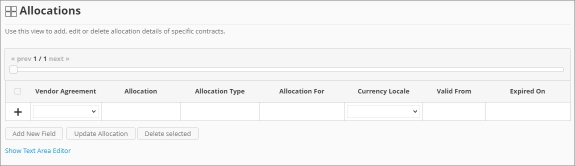
Figure 2. Analysis Server Administration: Contract Management – Allocations Page
Use the following descriptions of the columns for proper configuration:
- Vendor Agreement – the specific Contract the allocation is made for. The list is available when there are entries on the Contracts page
- Allocation – the specific value allocated for the contract
- Allocation Type – the specific type of value the allocation accepts
- Allocation For – a specific category the allocation is made for computing.
- Currency Locale – the specific locale code used as basis for handling currency format.
- Valid From – the start date of validity of the allocation
- Expired On – the end date of validity of the allocation
要件 #
Ensure to meet the following requirements before using the Allocations page:
- SQLデータベースが正常に作成されました。
- Enable Contract Management using the the Configuration page.
- Added Contracts using the Contracts page.
- List of allocations with details.
- Prepared file containing all allocations when using the Text Area Editor.
- 現在のウェブユーザーの管理権限。
レコードの追加 #
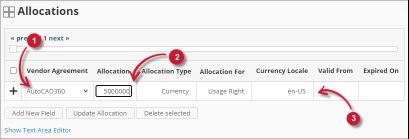
Follow these instructions to add an allocation entry:
- In the Allocations table, choose among the available Vendor Agreement.
- Click the Allocation column. This should transform into a textbox. Provide the desired value of the allocation.
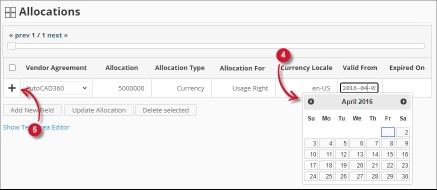
- Repeat the steps with the other columns – Allocation Type, Allocation For, と Currency Locale.

Figure 3. Analysis Server Administration: Allocations- Adding Record - Choose the date range for the validity of the vendor.
- Click the add symbol (+) located at the first column of the row.

Figure 4. Analysis Server Administration: Allocations – Adding Record
The list of allocations should include the newly added item.
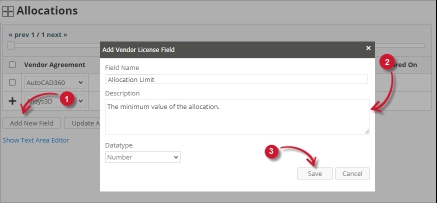
Adding a New Field #
Follow these instructions to add a new column for Allocation details:
- At the bottom of the Allocations table, click the Add New Field button.
The Add Vendor License Field dialog should appear. - Provide the following details.
- Field Name – a descriptive name of the field
- Description – a brief description to describe the field
- Datatype – the type of data the field accepts
- クリック セーブ を続ける。

Figure 5. Analysis Server Administration: Allocations – Adding New Field
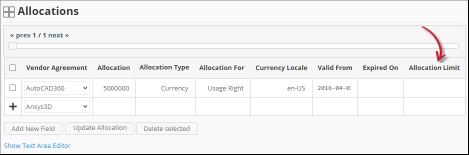
The Allocations table should include the newly added column.
Figure 6. Analysis Server Administration: Allocations – Adding New Field
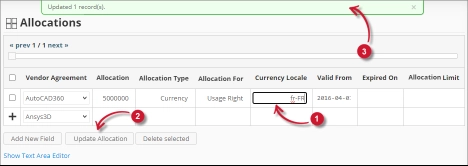
Updating a Record #
Follow these instructions to update a specific record:
- In the Allocations table, click the value of the column to update. This should transform to a textbox.
- Click the Update Allocation button at the bottom of the Allocations table.
- A notification message should appear at the top of the page showing the status of the update.

Figure 7. Analysis Server Administration: Allocations – Updating Record
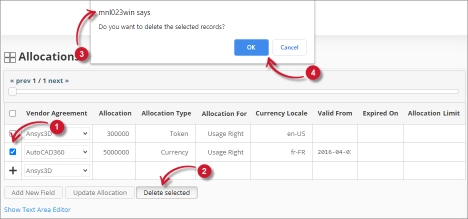
レコードの削除 #
Follow these instruction to delete record(s) from the Allocations tables:
- Click the corresponding checkbox of the record to deleted.
- Click the Delete selected button at the bottom of the table.
- 確認メッセージが表示されるはずです。
- クリック セーブ を続ける。

Figure 8. Analysis Server Administration: Allocations – Deleting Record
The Allocations table should automatically be updated.
テキストエリア・エディター #
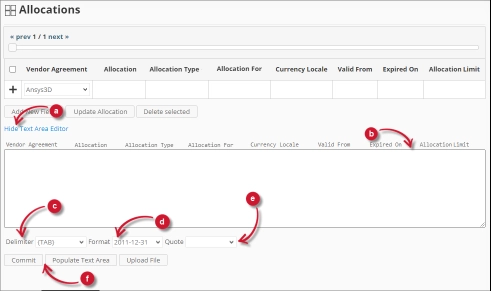
図 9.分析サーバー管理テキスト・エリア・エディタの詳細
テキスト・エリア・エディターの詳細 #
テキスト・エリア・エディタは、リスト内のレコードを追加、編集、削除するもう一つの方法である。エディタには以下のコンポーネントがあります:
- Toggle link- テキスト・エリア・エディタの表示を切り替えます。
- テキストエリア- レコードを貼り付けて操作するエリア。
- 区切り文字- レコードの各項目の区切り文字として使用する文字。
- Format- 日付に使用するフォーマット。
- Quote- レコードの各項目を区切るために使用する引用符。
- コマンド:
- コミット- テキストエリアで行った変更を保存します。
- Populate Text Area – retrieve all the records from the table and display it in the text area.

図 10.テキスト・エリア・エディタを使用した分析サーバー管理
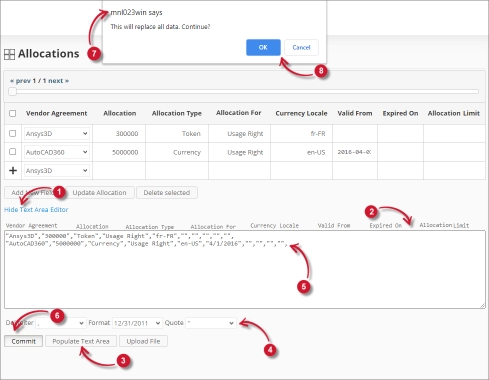
テキストエリア・エディタの使用 #
テキストエリア・エディターの使い方は以下の通りです:
- Click the toggle link Show/Hide Text Area Editor.
The Text Area Editor should be displayed. - Populate Text Areaボタンをクリックします。テキスト・エリア・エディターに入力されます。
- Modify the records as desired. Use the components for Delimiter, Format and Quote.
To add a record, simply add a new line.
To delete a record, simply delete the entire row of the record. - 選択した書式を適用するには、「テキストエリアに入力」をクリックします。選択した区切り文字、書式、引用符がテキスト・エリア・エディターで適用されることに注意してください。
- Click the Commit button.
A warning message should be prompted to confirm the application of the changes. - Click OK to continue.
The list should automatically be updated.
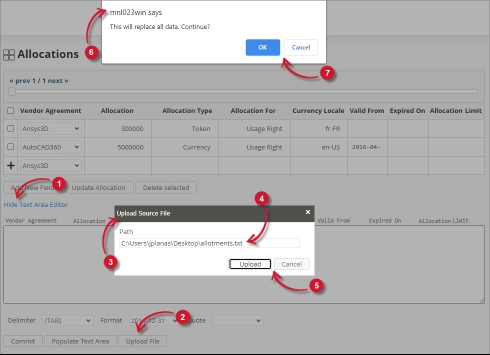
Uploading a Source File #
Follow these instructions to upload a prepared source file of Allocations details:
- Click the Toggle Link of the Text Area Editor.
- At the bottom of the page, click the Upload File button.
- The Upload Source File dialog should appear.
- Provide the valid path of the source file. The UNC path (\\path_to_file) is accepted.
- Click the Upload button to continue.
- A confirmation message of the upload process should appear.
- クリック OK を続ける。

Figure 11. Analysis Server Administration: Allocations – Upload File
トラブルシューティング #
This part provides the possible work around for known issue/s in the Allocations page.
Error page displayed when accessing page remotely #
There will be times when accessing the Allocations page remotely or via hostname displays an error page.

Figure 12. Analysis Server Allocations Page Troubleshooting: Error page displayed
この問題のトラブルシューティングには、以下の提案を使用してください:
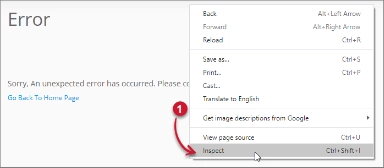
ウェブブラウザのコンソールエラーのチェック #
以下の手順に従って、ウェブブラウザのコンソールでエラーをチェックしてください:
- の中で Allocations ページ内の任意の場所で右クリックし 検査.

Figure 13. Analysis Server Allocations Page Troubleshooting: Error page displayed – Inspect
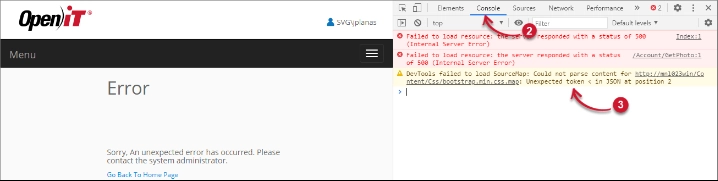
について 開発ツール が現れるはずだ。 - 選ぶ コンソール ツールの利用可能なタブから選択します。
コンソールは、エラーを含むウェブ・ブラウザのトランザクションを一覧表示する。
Figure 14. Analysis Server Allocations Page Troubleshooting: Error page displayed – Console - コンソールのエラーは専門的すぎる場合があります。 support@openit.com.
Access the website through localhost #
サーバーの実際のエラーメッセージを確認するには、Open iT Analysis Server をホストしているマシンに移動し、ブラウザでhttp://localhost にアクセスします。実際のエラーメッセージが表示されるはずです。
サポートやさらなる設定サポートについては、Open iT サポートチームまでお問い合わせください。
その他の参考資料については、ドキュメンテーションのページをご覧ください。