


Analysis Server – Administration – Contract Management – Vendors #
This document provides information on how to navigate and use the Vendors page of Contract Management under the Open iT Analysis Server Administration tab.
Introdução #
The Vendors page contains various functionalities to manage the list of vendors for contract management. The page is only visible to users with Administrative rights to Open iT Analysis Server.
Siga estas instruções para navegar para a página:
- Abra a interface web do Open iT Analysis Server usando um navegador da web.
- Passe o cursor sobre o separador Administração. Aguarde até aparecerem as sub-abas.
- Click the Contract Management tab to display all the sub-tabs.
- Click the Vendors sub-tab.
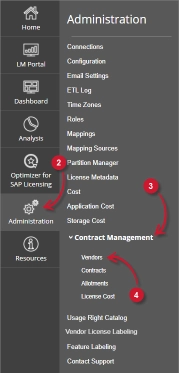
The Vendors page should be displayed.
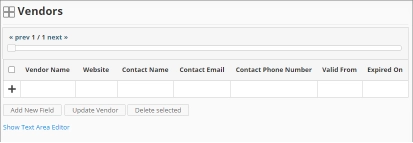
Use the following descriptions of the columns for proper configuration:
- Vendor Name – the specific name of the Vendor
- Website – the URI of the website of the Vendor
- Contact Name – specific name of the person to contact related to the Vendor
- Contact Email – the email address of the contact person
- Contact Phone Number – the contact details of the contact person
- Valid From – the start date of validity of the Vendor
- Expired On – the end date of validity of the Vendor
Requisitos #
Ensure to meet the following requirements before using the Vendors page:
- A base de dados SQL foi criada com sucesso.
- Enable Contract Management using the the Configuration page.
- List of vendors with details.
- Prepared file containing all vendors when using the Text Area Editor.
- Direitos administrativos do utilizador atual da Web.
Adicionar registo #
Follow these instructions to add a vendor entry:
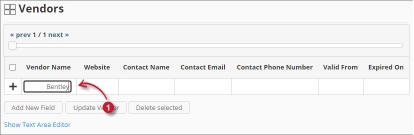
- In the Vendors table, click the Vendor Name column. This should transform into a textbox. Provide the name of the vendor.
- Repeat the steps with the other columns – Sítio Web, Contact Name, Contact Email, e Contact Phone Number.

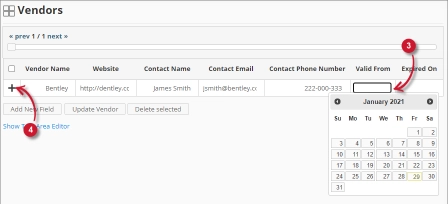
Figure 3. Analysis Server Administration: Vendors – Adding Record - Choose the date range for the validity of the vendor.
- Click the add symbol (+) located at the first column of the row.

Figure 4. Analysis Server Administration: Vendors – Adding Record
The list of vendors should include the newly added item.
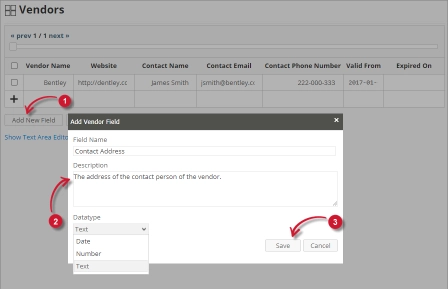
Adding a New Field #
Follow these instructions to add a new column for Vendor details:
- At the bottom of the Vendors table, click the Add New Field button.
The Add Vendor Field dialog should appear. - Provide the following details.
- Field Name – a descriptive name of the field
- Description – a brief description of the field
- Datatype – the type of data the field accepts
- Clicar Guardar para continuar.

Figure 5. Analysis Server Administration: Vendors – Adding New Field
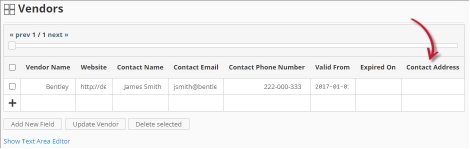
The Vendors table should include the newly added column.
Figure 6. Analysis Server Administration: Vendors – Added New Field
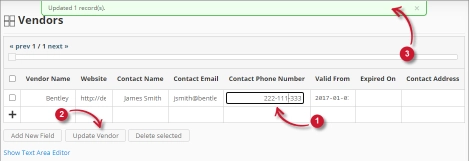
Updating a Record #
Follow these instructions to update a specific record:
- In the Vendors table, click the value of the column to update. This should transform to a textbox.
- Click the Update Vendor button at the bottom of the Vendors table.
- A notification message should appear at the top of the page showing the status of the update.

Figure 7. Analysis Server Administration: Vendors – Updating Record
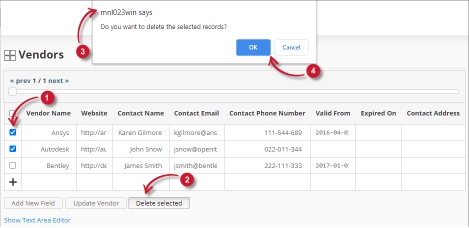
Apagar registo #
Follow these instructions to delete record(s) from the Vendors table:
- Click the corresponding checkbox of the record to deleted.
- Click the Delete selected button at the bottom of the table.
- Deve aparecer uma mensagem de confirmação.
- Clicar OK para continuar.

Figure 8. Analysis Server Administration: Vendors – Deleting Record
The Vendors table should automatically be updated.
Editor de área de texto #
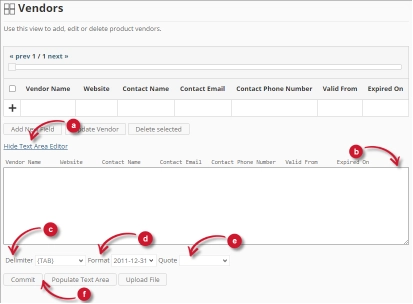
Figura 9. Detalhes do editor da área de texto da administração do Analysis Server
Detalhes do editor de área de texto #
O editor da área de texto é outra forma de adicionar, editar e apagar registos na lista. O editor tem os seguintes componentes:
- Alternar ligação - alterna a apresentação do editor da área de texto.
- Área de texto - área onde colar e manipular os registos.
- Delimitador - o carácter a utilizar como separador para cada item de um registo.
- Formato - o formato a utilizar para as datas.
- Aspas - aspas a utilizar para separar cada item de um registo.
- Comandos:
- Confirmar - guarda as alterações efectuadas na área de texto.
- Populate Text Area – retrieve all the records from the table and display it in the text area.

Figura 10. Administração do Analysis Server usando o editor de área de texto
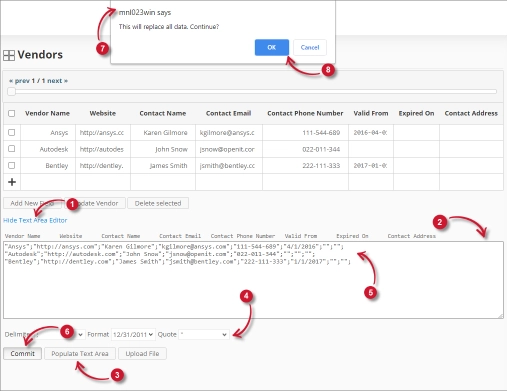
Utilizar o editor de área de texto #
Siga estas instruções para utilizar o editor da área de texto:
- Click the toggle link Show/Hide Text Area Editor.
The Text Area Editor should be displayed. - Clique no botão Preencher área de texto. O editor da área de texto deve ser preenchido.
- Modifique os registos conforme pretendido. Utilize os componentes Delimitador, Formato e Citação.
Para acrescentar um registo, basta acrescentar uma nova linha.
Para eliminar um registo, basta eliminar toda a linha do registo. - Clique em Popular área de texto para aplicar os formatos selecionados. Repare que o delimitador, o formato e a aspa selecionados devem ser aplicados no editor da área de texto.
- Clique no botão Commit.
Deve ser apresentada uma mensagem de aviso para confirmar a aplicação das alterações. - Clique em OK para continuar.
A lista deve ser actualizada automaticamente.
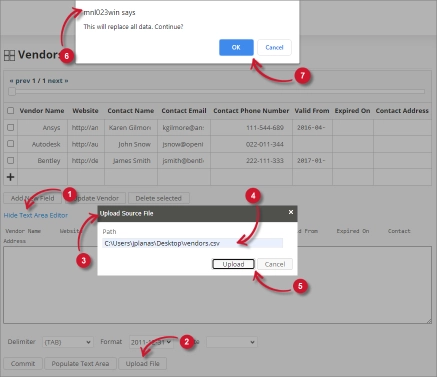
Uploading a Source File #
Follow these instructions to upload a prepared source file of Vendor details:
- Click the Toggle Link of the Text Area Editor.
- At the bottom of the page, click the Upload File button.
- The Upload Source File dialog should appear.
- Provide the valid path of the source file. The UNC path (\\path_to_file) is accepted.
- Click the Upload button to continue.
- A confirmation message of the upload process should appear.
- Clique em OK para continuar.
Resolução de problemas #
This part provides the possible work around for a known issue in the Vendors page.
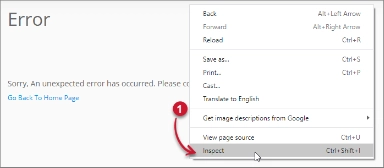
Página de erro apresentada quando o acesso não é feito no localhost #
There will be times when accessing the Vendors page remotely or via hostname; it displays an error page.

Utilize as seguintes sugestões para solucionar este problema:
Verificar se existem erros na consola do navegador Web #
Siga estas instruções para verificar se existem erros na consola do navegador Web:
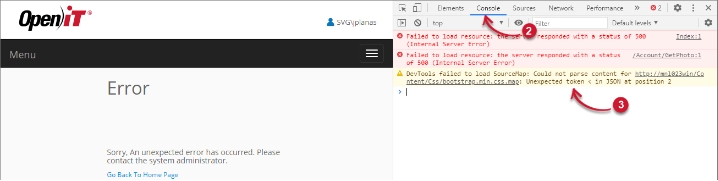
- No Vendors página, clique com o botão direito do rato em qualquer parte da página e selecione Inspecionar.

Figure 13. Analysis Server Vendors Page Troubleshooting: Error page displayed – Inspect
O Ferramentas para programadores deve aparecer. - Escolher Consola a partir dos separadores disponíveis da ferramenta.
A consola lista as transacções do navegador Web, incluindo os erros.
Figure 14. Analysis Server Vendors Page Troubleshooting: Error page displayed – Console - Por vezes, os erros na consola podem ser demasiado técnicos. Para obter uma resposta imediata, envie o detalhe do erro para support@openit.com.
Aceder ao sítio web através de localhost #
Para ver a mensagem de erro real do servidor, vá para a máquina que aloja o Servidor de Análise Open iT e, em seguida, aceda a http://localhost num browser. A mensagem de erro real deve ser exibida.