


This document provides information on how to navigate and use the Allocations page of Contract Management under the Open iT Analysis Server Administration tab.
Introdução #
The Allocations page contains various functionalities to manage the list of specific allotment corresponding to a specific contract for contract management. The page is only visible to users with Administrative rights to Open iT Analysis Server.
Siga estas instruções para navegar para a página:
- Abra a interface web do Open iT Analysis Server usando um navegador da web.
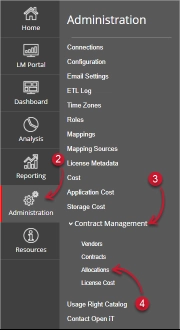
- Passe o cursor sobre o separador Administração. Aguarde até aparecerem as sub-abas.
- Click the Contract Management tab to display all the sub-tabs.
- Clique no botão Allocations sub-tab.

Figure 1. Analysis Server Administration: Contract Management – Allocations – Navigation
The Allocations page should be displayed.
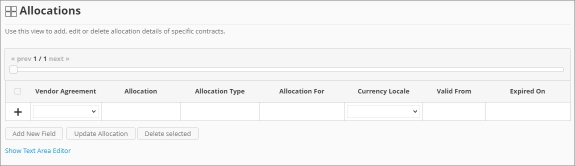
Figure 2. Analysis Server Administration: Contract Management – Allocations Page
Use the following descriptions of the columns for proper configuration:
- Vendor Agreement – the specific Contract the allocation is made for. The list is available when there are entries on the Contracts page
- Allocation – the specific value allocated for the contract
- Allocation Type – the specific type of value the allocation accepts
- Allocation For – a specific category the allocation is made for computing.
- Currency Locale – the specific locale code used as basis for handling currency format.
- Valid From – the start date of validity of the allocation
- Expired On – the end date of validity of the allocation
Requisitos #
Ensure to meet the following requirements before using the Allocations page:
- A base de dados SQL foi criada com sucesso.
- Enable Contract Management using the the Configuration page.
- Added Contracts using the Contracts page.
- List of allocations with details.
- Prepared file containing all allocations when using the Text Area Editor.
- Direitos administrativos do utilizador atual da Web.
Adicionar registo #
Follow these instructions to add an allocation entry:
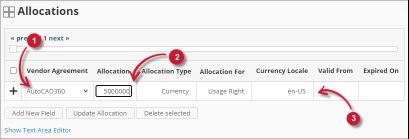
- In the Allocations table, choose among the available Vendor Agreement.
- Click the Allocation column. This should transform into a textbox. Provide the desired value of the allocation.
- Repeat the steps with the other columns – Allocation Type, Allocation For, e Currency Locale.

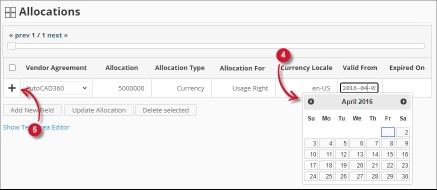
Figure 3. Analysis Server Administration: Allocations- Adding Record - Choose the date range for the validity of the vendor.
- Click the add symbol (+) located at the first column of the row.

Figure 4. Analysis Server Administration: Allocations – Adding Record
The list of allocations should include the newly added item.
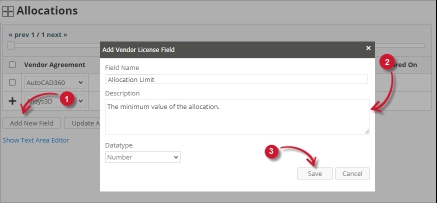
Adding a New Field #
Follow these instructions to add a new column for Allocation details:
- At the bottom of the Allocations table, click the Add New Field button.
The Add Vendor License Field dialog should appear. - Provide the following details.
- Field Name – a descriptive name of the field
- Description – a brief description to describe the field
- Datatype – the type of data the field accepts
- Clicar Guardar para continuar.

Figure 5. Analysis Server Administration: Allocations – Adding New Field
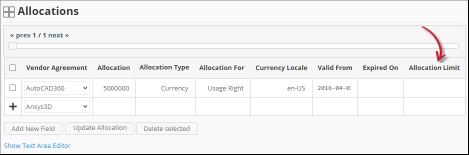
The Allocations table should include the newly added column.
Figure 6. Analysis Server Administration: Allocations – Adding New Field
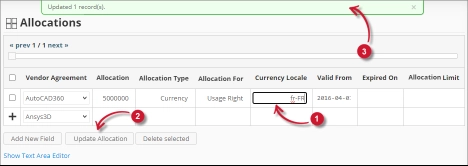
Updating a Record #
Follow these instructions to update a specific record:
- In the Allocations table, click the value of the column to update. This should transform to a textbox.
- Click the Update Allocation button at the bottom of the Allocations table.
- A notification message should appear at the top of the page showing the status of the update.

Figure 7. Analysis Server Administration: Allocations – Updating Record
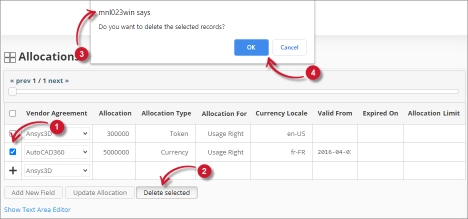
Apagar registo #
Follow these instruction to delete record(s) from the Allocations tables:
- Click the corresponding checkbox of the record to deleted.
- Click the Delete selected button at the bottom of the table.
- Deve aparecer uma mensagem de confirmação.
- Clicar Guardar para continuar.

Figure 8. Analysis Server Administration: Allocations – Deleting Record
The Allocations table should automatically be updated.
Editor de área de texto #
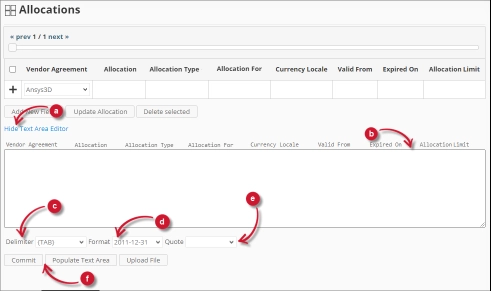
Figura 9. Detalhes do editor da área de texto da administração do Analysis Server
Detalhes do editor de área de texto #
O editor da área de texto é outra forma de adicionar, editar e apagar registos na lista. O editor tem os seguintes componentes:
- Alternar ligação - alterna a apresentação do editor da área de texto.
- Área de texto - área onde colar e manipular os registos.
- Delimitador - o carácter a utilizar como separador para cada item de um registo.
- Formato - o formato a utilizar para as datas.
- Aspas - aspas a utilizar para separar cada item de um registo.
- Comandos:
- Confirmar - guarda as alterações efectuadas na área de texto.
- Populate Text Area – retrieve all the records from the table and display it in the text area.

Figura 10. Administração do Analysis Server usando o editor de área de texto
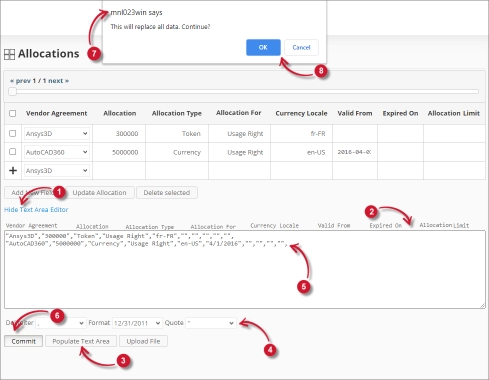
Utilizar o editor de área de texto #
Siga estas instruções para utilizar o editor da área de texto:
- Click the toggle link Show/Hide Text Area Editor.
The Text Area Editor should be displayed. - Clique no botão Preencher área de texto. O editor da área de texto deve ser preenchido.
- Modify the records as desired. Use the components for Delimiter, Format and Quote.
To add a record, simply add a new line.
To delete a record, simply delete the entire row of the record. - Clique em Popular área de texto para aplicar os formatos selecionados. Repare que o delimitador, o formato e a aspa selecionados devem ser aplicados no editor da área de texto.
- Click the Commit button.
A warning message should be prompted to confirm the application of the changes. - Click OK to continue.
The list should automatically be updated.
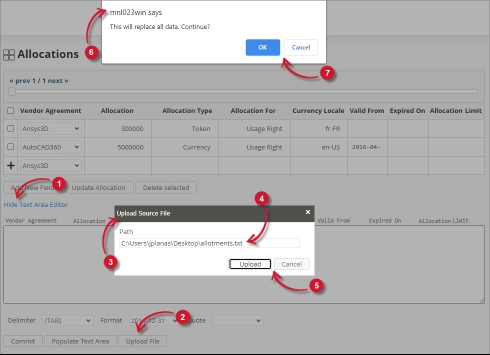
Uploading a Source File #
Follow these instructions to upload a prepared source file of Allocations details:
- Click the Toggle Link of the Text Area Editor.
- At the bottom of the page, click the Upload File button.
- The Upload Source File dialog should appear.
- Provide the valid path of the source file. The UNC path (\\path_to_file) is accepted.
- Click the Upload button to continue.
- A confirmation message of the upload process should appear.
- Clicar OK para continuar.

Figure 11. Analysis Server Administration: Allocations – Upload File
Resolução de problemas #
This part provides the possible work around for known issue/s in the Allocations page.
Error page displayed when accessing page remotely #
There will be times when accessing the Allocations page remotely or via hostname displays an error page.

Figure 12. Analysis Server Allocations Page Troubleshooting: Error page displayed
Utilize as seguintes sugestões para solucionar este problema:
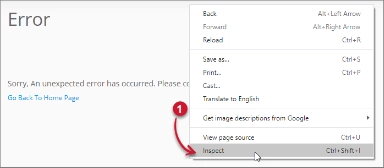
Verificar se existem erros na consola do navegador Web #
Siga estas instruções para verificar se existem erros na consola do navegador Web:
- No Allocations página, clique com o botão direito do rato em qualquer parte da página e selecione Inspecionar.

Figure 13. Analysis Server Allocations Page Troubleshooting: Error page displayed – Inspect
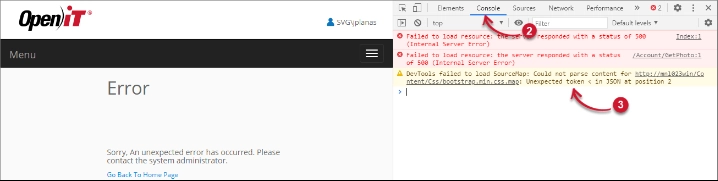
O Ferramentas para programadores deve aparecer. - Escolher Consola a partir dos separadores disponíveis da ferramenta.
A consola lista as transacções do navegador Web, incluindo os erros.
Figure 14. Analysis Server Allocations Page Troubleshooting: Error page displayed – Console - Por vezes, os erros na consola podem ser demasiado técnicos. Para obter uma resposta imediata, envie os detalhes do erro para support@openit.com.
Access the website through localhost #
Para ver a mensagem de erro real do servidor, vá para a máquina que aloja o Servidor de Análise Open iT e, em seguida, aceda a http://localhost num browser. A mensagem de erro real deve ser exibida.
Para obter assistência ou suporte de configuração adicional, contacte a equipa de suporte da Open iT.
Para obter referências adicionais, pode visitar a nossa página Documentação.