This document provides information on how to navigate and use the Time Zones page under Open iT Analysis Server Administration tab.
Introduction #
The Time Zones page contains various functionalities to manage Time Zones for data processing. The page is only visible to users with Administrative rights to Open iT Analysis Server.
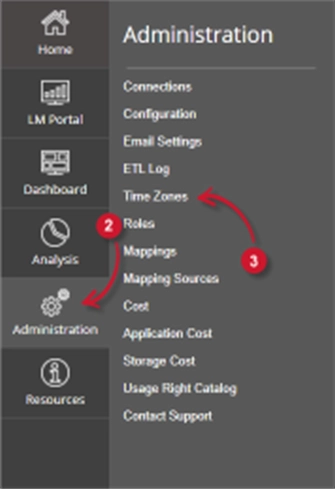
Follow these instructions to navigate to the page:
- Open the Open iT Analysis Server web interface using a web browser.
- Hover the Administration tab. Wait till the sub-tabs appear.
- Click the Time Zones tab.

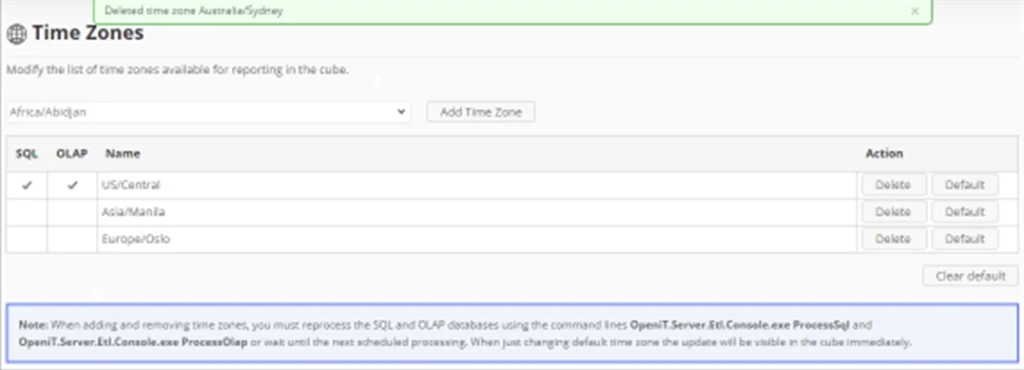
The Time Zones page should be displayed.
The default time zone selected is US/Central.

Requirements #
Ensure to meet the following requirements before using the Time Zones page:
- SQL and OLAP databases are successfully created.
- Administrative rights of the current web user.
Adding Time Zones #
Follow these steps to add time zones:

- Select from the list of time zones.
- Click the Add Time Zone button.
- The selected time zone should be added in the list.
- A confirmation message should appear at the top of the page.
- Repeat steps 1 to 2 to add multiple time zones.
Note: Make sure to read and follow the note at the bottom of the page. These steps are important in order to reflect the changes in the OLAP cubes for reporting.
Removing Time Zones #
Follow these steps to remove time zones:
1. Choose the time zone to remove.

2. Click the Delete button of the time zone desired to be removed.
The selected item should be automatically removed in the list.

A confirmation message should appear at the top of the page.
3. Repeat steps 1 to 2 when removing multiple time zones.
Important: Make sure to read and follow the note at the bottom of the page. These steps are important in order to reflect the changes in the OLAP cubes for reporting.
Setting and clearing the default Time Zone #
When a time zone is set to default, it is the main time zone used when reporting.
Important: Setting of default time zone should be done after accomplishing the instructions displayed in the note at the bottom of the page.

Follow these steps to set the default time zone:
1. Choose the time zone to set as default.

2. Click the Default button of the time zone to set as default.
3. Check marks should appear in the SQL and OLAP columns in the list.
A confirmation message should appear at the top of the page.
To clear the default time zone, click the Clear default button at the bottom-right of the list.
A confirmation message should appear at the top of the page. Check marks should disappear in the SQL and OLAP columns.

For assistance or further configuration support, please contact your Open iT support team.
For additional references, you may visit our Documentation page.


