

Introduction #
The Email Settings page contains various configuration for sending email messages and alerts.
Follow these instructions to navigate to the page:
- Open the Open iT Analysis Server web interface using a web browser.
- Hover the cursor over the Administration tab. Wait till the sub-tabs appear.
- Click the Email Settings tab.
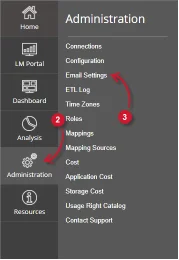
Figure 1. Analysis Server Administration: Email Settings Navigation
The Email Settings page should be displayed.
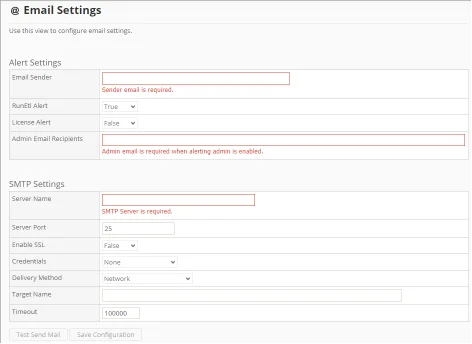
Figure 2. Analysis Server Administration: Email Settings Page
Requirements #
Ensure to meet the following requirements before using the Email Settings page:
- SQL database is successfully created.
- Administrative rights of the current web user.
- Open iT Alerts service is running.
- SMTP server details for SMTP settings.
Configuring Alert Settings #
Use this to provide configurations for alerting services. Follow these instructions to properly setup the alerts:

Figure 3. Analysis Server Administration Email Settings – Alert
- Provide a valid email address to the Email Sender textbox. This is a required field.
- Set the RunEtl Alert option to True to enable or False to disable the sending of alerts regarding the daily data processing of Open iT Analysis Server.
- Set the License Alert option to True to enable or False to disable the sending of alerts regarding the status of the Open iT license.
- Provide valid email addresses of the recipients of the enabled alerts to the Admin Email Recipients textbox. Separate the items with comma (,). This is required when one of the alerts is enabled.
Configuring SMTP Settings #
Use this to provide configurations for Simple Mail Transfer Protocol (SMTP) for sending email alerts. Follow these instructions to properly setup the configuration:
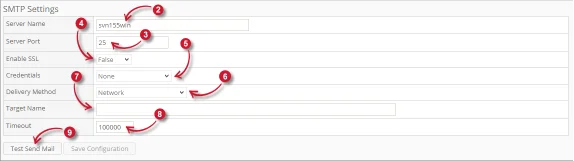
Figure 4. Analysis Server Administration Email Settings – SMTP
- Make sure that the Alert Settings are properly configured.
- Provide the valid hostname or IP address in the Server Name textbox.
- Provide the valid and open SMTP port number in the Server Port textbox. The default value is 25.
- Set the Enable SSL option to True to enable or False to disable the sending of email through secured socket layer (SSL).
- Choose among the Credentials options to be used in authenticating the sending of email messages.
- None – no credentials is used.
- Custom – provide the valid Username and Password to be used.
- Default Credentials – use the System.Net.Credentials.DefaultCredentials of the Open iT Analysis Server application.
- Service Account – use the credentials running the service.
- Choose among the Delivery Method options to be used when delivering email alerts.
- Network – messages are sent through the network to an SMTP server.
- SpecifiedPickupDirectory – messages are copied to the specified pickup directory location.
- PickupDirectoryFromIis – messages are copied to the pickup directory used by a local Internet Information Services (IIS) for delivery.
- Specify the Service Provider Name (SPN) used for authentication when the SMTP server uses extended protection or has a relay server in the Target Name textbox. This is optional.
- Provide the amount of time the process of sending email messages calls a timeout in the Timeout textbox. 100000 seconds is by default the value.
- Click the Test Send Mail to test the provided configuration.
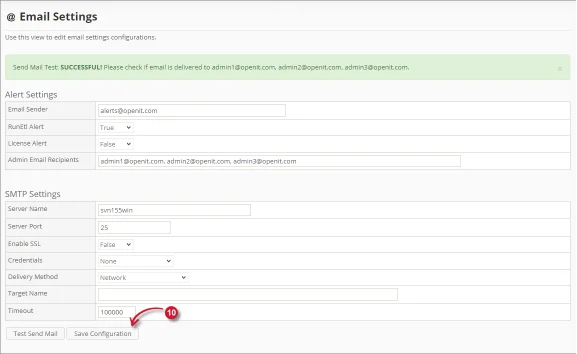
Figure 5. Analysis Server Administration Email Settings – Test Send Mail
Wait until the validation message appears. The recipients configured should receive a test mail.
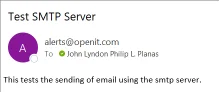
Figure 6. Analysis Server Administration Email Settings – Test Send Mail Received
When successful, click the Save Configuration button to save the settings. Wait for the confirmation message to appear.

Figure 7. Analysis Server Administration Email Settings – Save Configuration
Troubleshooting #
This part provides the possible work around for a known issue in the Email Settings page.
Send Mail Test Failed #
There will be times that the sending of test mail will fail and the notification message displays an error message:
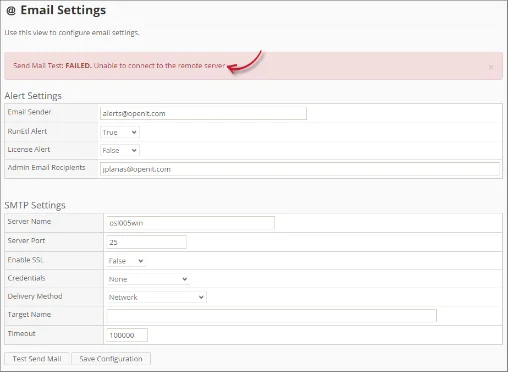
Figure 8. Analysis Server Email Settings Page Troubleshooting: Send Mail Test Failed
Use the following checklist to troubleshoot the issues:
- Make sure that the Server Name is valid and correct.
- Make sure that the Server Port used is accessible and open for SMTP transactions.
- Make sure that the Service Account has the rights to the SMTP server.
- Make sure that the Email Sender is valid and correct.
- Adjust the Timeout value to lengthen the duration.
For assistance or further configuration support, please contact your Open iT support team.
For additional references, you may visit our Documentation page.