

This document provides information on how to properly navigate and use the License Metadata page under the Open iT Analysis Server Administration tab.
Introduction #
The License Matadata page contains various functionalities to configure and setup the details of license servers displayed in the License Monitor Portal. The page is only visible to users with Administrative rights to Open iT Analysis Server and is hidden by default.
Activating License Metadata #
Follow these steps to enable or disable the License Metadata:
- Go to the Configuration page of Analysis Server web interface.

Figure 1. Analysis Server Administration: License Metadata - Locate the configuration key Root.Web.LicenseMetaData.
- Click the value and it should transform into a dropdown.
- Set the value to True to enable.
- Click Save to apply the changes.
- Click the Reset Session button located at the bottom of the configuration table.

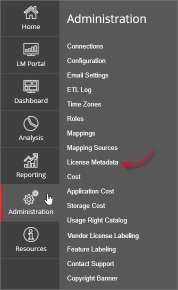
Figure 2. Analysis Server Administration: Reset Session - Confirm that the License Metadata tab is visible and accessible under the Administration tab.

Figure 3. Analysis Server Administration: License Metadata Tab


The License Metadata page should be displayed.
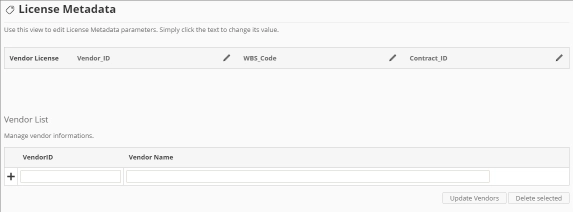
Figure 4. Analysis Server Administration License Metadata Page
Requirements #
Ensure to meet the following requirements before using the License Metadata page:
- SQL database is successfully created.
- License Status data is available in the Core Server database.
- Data should be loaded and processed.
- Prepared list of products with various license metadata for configuration.
- Administrative rights of the current web user.
Updating detail name #
There are three initially included details that can be configured – Vendor_ID, WBS_Code and Contract_ID. These fields are customizable and can be updated to comply with the needed information in the License Monitor Portal.
Follow these instructions to update the name of the detail:

Figure 5. Analysis Server Administration Edit License Metadata details
- In column header of the License Metadata table, click the edit icon. This should transform into a textbox.
- Modify the value to the desired detail name.
- Click the check symbol to save the changes.
Adding Vendors #
Follow these instructions to add vendors:
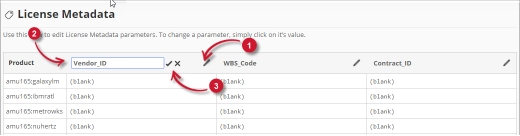
Figure 6. Analysis Server Administration License Metadata: Adding Vendors
- In the Vendor List pane located under the License Metadata table, type in the Vendor_ID column the desired value.
- In the Vendor Name column, type the name of the vendor associated with the Vendor_ID.
- Click the add symbol (+) to add the item in the list.
Updating Vendors #
Follow these instructions to update vendors in the Vendors List:
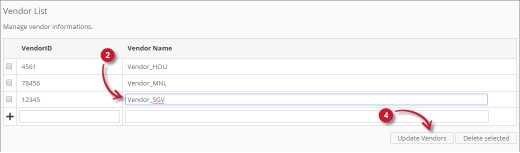
Figure 7. Analysis Server Administration License Metadata: Editing Vendors
- In the list, look for the item to update.
- Click the column value and it should transform into textbox.
- Modify the value.
- Click the Update Vendors button to apply the changes.
Deleting Vendors #
Follow these instructions to delete vendors:
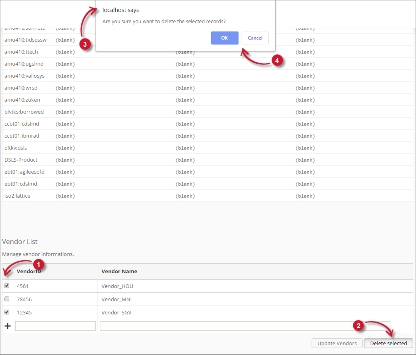
Figure 8. Analysis Server Administration License Metadata – Deleting Vendors
- In the list, click the tick box of the item to delete.
- Click the Delete Selected button.
- A confirmation message should appear confirming the deletion of the item.
- Click OK to continue.
The list should automatically update.
Configuring License Metadata #
Follow these instructions to configure the details in License Metadata:
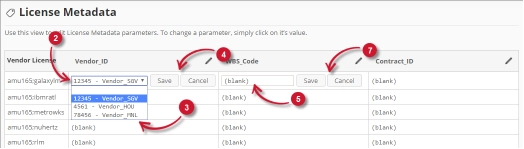
Figure 9. Analysis Server Administration Configuring License Metadata
- In the Vendor License list, look for the license server to configure.
- In the Vendor_ID column, click the value and it should transform into a dropdown list. Notice that the options are the vendors added in the vendors list.
- Choose among the options.
- Click Save to apply the changes.
- In the last two columns, click the values and it should transform into textbox.
- Modify the value.
- Click Save to apply the changes.
Verification #
Configured License Metadata is reflected in License Monitor Portal. Follow these instructions to verify the details:
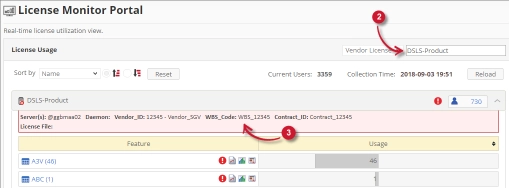
Figure 10. Analysis Server Administration License Metadata: Verification
- Go to LM Portal page.
- Search for the Vendor License configured in the License Metadata page.
- Click the vendor license name to show the license server metadata. Notice that the configured details are shown.
Troubleshooting #
This part provides the possible work around for a known issue in the License Metadata page.
Error page displayed when accessing not in localhost #
There will be times when accessing the License Metadata page remotely or via hostname; it displays an error page.
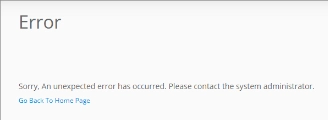
Figure 11. Analysis Server License Metadata Page Troubleshooting: Error page displayed
Use the following suggestions to troubleshoot this issue:
Check for Web Browser Console Errors #
Follow these instructions to check for errors in the web browser console:
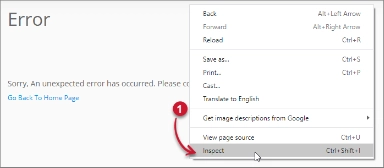
- In the License Metadata page, right click anywhere inside the page and choose Inspect.

Figure 12. Analysis Server License Metadata Page Troubleshooting: Error page displayed – Inspect
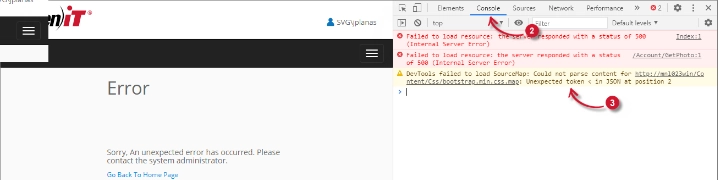
The Developer Tools should appear. - Choose Console from the available tabs of the tool.
The console lists web browser transactions including errors.
Figure 13. Analysis Server License Metadata Page Troubleshooting: Error page displayed – Console - Errors in the console may sometimes be too technical, for immediate response, send the error detail to support@openit.com.
Access the website through localhost #
To see the server’s real error message, go to the machine hosting the Open iT Analysis Server, then access http://localhost on a browser. The real error message should be displayed.